Why use it?
The Accessibility Block allows users to customise Moodle pages to meet their accessibility requirements.
Step 1: Add an Accessibility block
Go to the course page and Turn editing on.
On the left side of your course page, scroll down to the Add a block block. Click Add… and from the drop-down select Accessibility.
Adding a block will cause the page to reload. Locate the newly added block on the left-hand side of your course page.
The accessibility block should now appear on your course for all users.
Using the accessibility tools
The block allows users to decrease and increase font size, and apply three different colour schemes to Moodle pages.
The settings can be reset or applied as required.
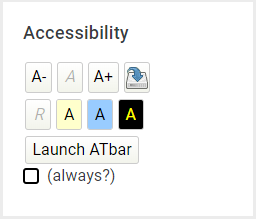
Alter text size
Decrease Text Size
Reset Text Size
Increase Text Size
Change contrast
Lowered Contrast 1
Lowered Contrast 2
High Contrast
Default Colour Scheme
ATbar Functions
The ATbar can be accessed by clicking on the Launch ATbar button that is located within the block. Ticking the checkbox will cause ATbar to be automatically loaded each time you visit a page containing the Accessibility block.
ATbar has several advanced Accessibility functions on top of the ability to change page styles, including Text-To-Speech and Dictionary lookup.
Note: If you change styles with ATbar, they will not persist between pages as they do with the native functions, nor are you currently able to save them.
Font settings
Spellchecker
Dictionary
Text to speech
Word prediction
Change styles and colour overlay
