...
In appearance you have a range of options on how the lesson will behave:
The File pop-up allows you to launch a file in a different window to the lesson as a reference point. For example, this might be a map for a geography lesson or a diagram for an anatomy lesson, etc. A range of file formats are possible, including video and audio as well as images and text.
In terms of the other options, in the example below we have selected Yes for Display ongoing score and Display menu and left the rest as default. This means the students will see a score as they progress and there will be a navigation menu on the left to provide them with the ability to select individual pages rather than being guided through in a set sequence.
Availability
Use Availability to set a time period for the lesson if required.
Use Prerequisite lesson if students need to complete a prior Add media files to be used in the lesson from the Linked media files upload area.
A Progress bar and the navigation menu can be optionally displayed. This means that this information will appear in every page of the lesson. To view more options click Show more..
Availability
If required, set an availability date, a deadline or a time limit for the lesson.
Flow control
Flow control is quite important even for simple lessons such as the one exemplified in this guide. We have changed Allow student review to Yes to allow students to review the lesson (see also Re-takes allowed under Grade). We have also selected Yes on Provide option to try a question again. However, we have limited the number of attempts on a question to 4.
Grade
In Grade, choose how to handle grading and attempts. In the example below, we have chosen Custom scoring as opposed to using Grade for automatic scoring. This means we can allocate different scores per question. We are also selecting Yes to allow the students to re-take the lesson and leaving Handling of re-takes as the default Use meanBy changing the flow control settings you can allow student to review the lesson and to attempt questions more than once.
Grade
Choose the type of the grade and how to handle grading and attempts.
On completion, click Save and Return to course.
N.B. As with other Moodle activities, it is not always possible to grasp the significance of some of the settings until you have seen them in action, so set what you can on your first attempt and then revisit these settings when you have had a chance to experiment with your lesson content.display.
Step 3: Add pages to a Lesson
Having set up a lesson, you are ready to populate it with content and question pages
Step 3: Add pages to a Lesson
Lessons require some preparation before you try to set them up in Moodle. Even for simple ones, you are advised to produce some kind of flowchart of the instructional paths.
Once the lesson container has been set up you can populate it with content and question pages. Turn editing on and click the lesson to start the page creation process. You will be asked how you want to proceed. In this guide we will look at question and content pages. For the other options see more information on lesson content types section at the bottom of this page. Select Add a question page to follow the example being used in the guide.
, which then can be displayed in a linear order or depending on the answers to students provide on question pages.
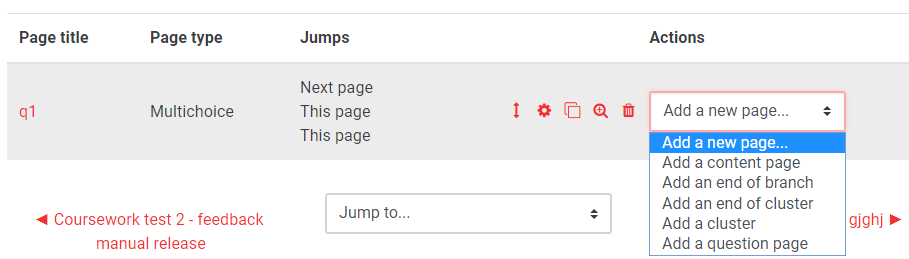
To add pages, you can click on the initial Add a new … page or later choosing the relevant page type from the Actions drop-down.
| Expand | ||
|---|---|---|
| ||
 |
Content page
This is a page to provide information without the students having to answer questions. When they have finished reading, students click on the Next button to proceed to the next page of the lesson. You as an editor can define which page the student would be taken to.
Question page
You are then prompted as to the type of question you would like to create from Essay, Matching, Multichoice (default), Numerical, Short answer or True/false. See Question types on Moodle Docs for more information for more information.
Accept the default Multichoice and click Add a question page.
Give the page a title, which you may also want to repeat in Page contents as the title of a question page is not displayed to students. You can also add a picture if you wish. Then type the question text. This example is a single correct answer, so Multiple-answer is unchecked.
Next, add the answers and responses. Note that because Custom scoring was selected in lesson settings, it is possible to vary the scores per question and allow for Answer 2 to be partially right. In Jump, specify the page that the question response should link to if other than Next page. Both answers 1 and 2 link to Historical context, whereas Answer 3 (the wrong answer) takes the student to a different page. (See below.)Click Save page to complete the page.This takes you to the Edit tab where you can continue to create pages or Preview the question by clicking the icon on the right. (To preview the whole lesson use the Preview tab.)
Take the question and make sure it performs as expected. You may want to Switch role to student to test scoring.
To create a new page, return to the Edit tab and click the drop-down on Add a new page on the far right. Select Add a content page this time.
Start by adding the Page title and contents.
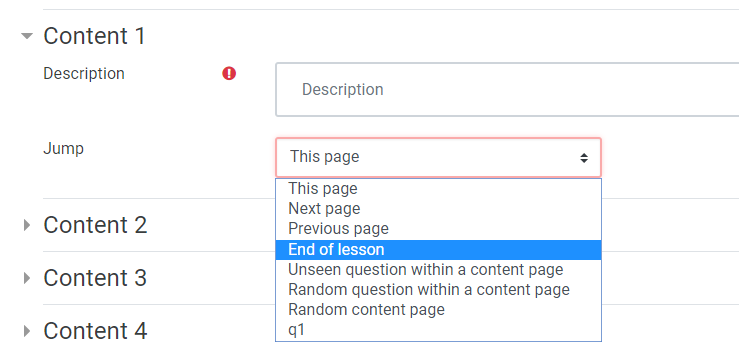
Then use Content 1, 2 …. to provide alternative routes from this page to other content. (Unlike question pages where the student’s route is determined by answering a question, on content pages students make choices as to where to go next.) In this example there is a single route at this point, so we have added History as the text to appear on the content button. We have also added Jump information to the relevant page. See Add a content page on Moodle Docs for more information.
Then Save page to go back to the Edit. You can then Preview the page.
Continue creating content and question pages as required.
When you get to the final page(s), select End of lesson as the jump.
To make changes to the lesson at any time, Turn editing on and click the lesson, then use Add new page to add a new page (see above) or use the editing cog to edit an existing page. You can also move and delete pages.
To take the lesson as a student, use Switch role to student. This way you will see how scoring works.
...
.
Step 4: Set branching
You can create branches by defining where students would Jump after a content or a question page.
| Expand | ||
|---|---|---|
| ||
 |
In the case of question pages, you can set where to jump to for different answers. This means, for example, that students who did not answer correctly can be taken to an additional explanatory page which would be not displayed to those who chose the correct answer.
Use the Preview tab to go through different the pathways you have set.
| Filter by label (Content by label) | ||
|---|---|---|
|