Introduction
Elsewhere on the LSE website there is guidance on producing resources for online teaching that explains the importance of making your course materials accessible to all, and what steps you need to take to achieve that.
This page explains how to take those steps in practice.
How do I … ?
Use headings and subheadings
How you do this depends on the source of your text. In general, your text will be most accessible in the form of HTML, less so in Word and PowerPoint documents and PDFs produced from them, and even less so in PDFs produced from LaTeX.
In HTML
As in Word, the Moodle text editor ("HTML editor") has a paragraph styles button that allows you to create headings. 
Moodle HTML editor toolbar
Click anywhere within the line of text that you want to turn into a heading, and choose the heading style you want from the paragraph styles menu.
Remember:
Always respect the hierarchy of headings - start with "Heading (large)" for the main title, then "Heading (medium)" for the next level down, and so on.
Avoid creating "false headings" by changing the size or weight of the text - when you do this, assistive technologies are unable to navigate the document properly.
In Word & PDF
You can apply headings consistently in Word using the Styles menu, located on the Home tab. 
Word 365 for Windows ribbon

Word 365 for Mac ribbon
You can click anywhere within the line of text that you want to turn into a heading, and choose the heading style you want from the Styles menu.
Remember:
Always respect the hierarchy of headings - start with Heading 1 for the main title, then Heading 2 for the next level down, and so on.
Avoid creating "false headings" by changing the size or weight of the text - when you do this, assistive technologies are unable to navigate the document properly.
If you need to change the way the headings look, you can edit them (see Customise or create new styles), or choose a whole new "style set" (you'll find these on the Design tab in Word).
When you convert Word to PDF, all the heading information is carried over, so you don't need to do anything additional to the resulting PDF document.
In PowerPoint & PDF
The easiest way to make sure you are using appropriate headings in PowerPoint is to use slide layouts. In fact, you are almost certainly already using slide layouts: either the default ones, or those that come with a specific template. In general, your headings will be set up correctly if you stick to these layouts. However, problems may arise if you choose to edit these slide layouts.
This guide from WebAIM, PowerPoint Accessibility: Slide layouts, gives a simple explanation of how to set up your slides correctly.
In Latex & PDF
Unfortunately, it is very difficult to produce accessible PDFs from a LaTeX source. Some accessibility-related packages do exist, but they are very limited in what they can achieve, and in our testing we have been unable to create PDFs that meet the minimum accessibility requirements.
The workaround for this is to convert LaTeX content into HTML, which can then be uploaded to Moodle. Either of the following applications are suitable for carrying out this conversion:
Both are free to download, and both are command-line applications, which means they are for the slightly more technically-savvy user; but if you use LaTeX, then that may well describe you! Both tools will convert TeX to HTML5, with an option to convert mathematical notation to MathML - this will improve accessibility further, giving users with visual impairments alternative ways to access the mathematical notation.
Use alt-text for images
The aim of alt-text is to provide an alternative for those who cannot see the image. It need only describe the most important features that the image is intended to communicate. When an image is purely decorative, it does not need alt-text.
For example,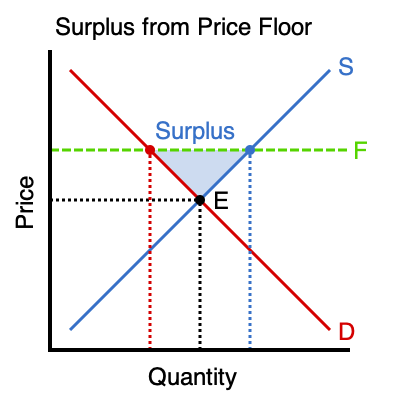
A suitable alt-text might be:
'Plot of price vs. quantity, showing supply and demand curves crossing at the market price, E. A price floor is set at a level F, which is greater than E. At the price floor, supply exceeds demand, causing a surplus.'
This communicates the key points of the diagram (I hope - I'm not an economist). Note that it assumes a certain level of prior knowledge that might be expected of the intended audience.
Conversely, there should be no need for this level of detail:
'Black lines form a right angle, with "Price" and "Quantity" written alongside each one. A blue line slopes up from left to right while a red line slopes down from left to right, and they meet at point E. A green dotted line labelled F runs horizontally across the upper part of the diagram etc. etc.'
The way you add alt-text depends on the application you are using:
Moodle HTML editor
Moodle makes it very simple. When you add an image using the HTML editor, you'll see the following window:
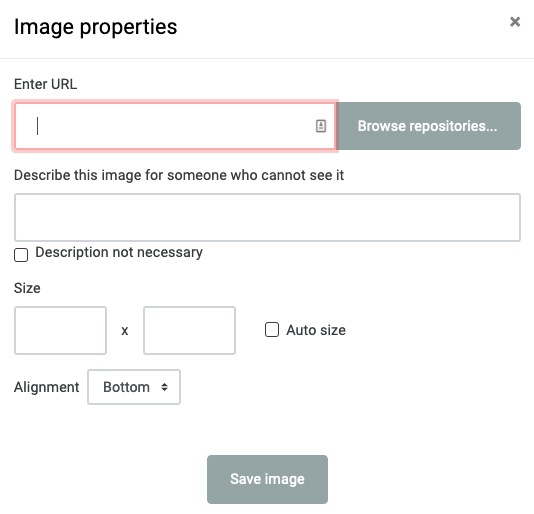
Moodle does not let you save the image until you either provide the alt-text (in the "Describe this image…" field) or else tick the "Description not necessary" box to indicate that the image is purely decorative.
Word & PowerPoint
When you add a picture to a Word or PowerPoint document, you may find that the application automatically creates the alt-text for you, using machine learning to generate a description for the picture.
If it does not do this, or if you want to change the text, you can right-click on the picture, and choose "Edit Alt Text…" from the menu. This will give you a box where you can add the text. There is also a "Mark as decorative" checkbox for images that do not require alt-text.
LaTeX
Unfortunately, it is very difficult to produce accessible PDFs from a LaTeX source. Some accessibility-related packages do exist, but they are very limited in what they can achieve, and in our testing we have been unable to create PDFs that meet the minimum accessibility requirements.
As it stands, we have not identified a reliable way to add alt-text to images within LaTeX, even when that LaTeX is converted to HTML. Unfortunately, the only solution we can offer at the present time is to edit the HTML after conversion, and manually add the alt-text to the HTML.
These instructions will be updated when a better solution is identified.
Use text boxes over images
The following images show an example of the problem of laying text over an image. The text here is not easy to read, even for a reader with no visual or learning difficulties. Even changing the text colour will not help, as the underlying image is a mixture of colours and shades.
The next image shows a simple fix for this problem. By changing the background colour of the text fields to a pale, semi-transparent shade, the text stands out without completely obscuring the image. 
You can achieve this effect in Word or PowerPoint as follows:
Move the mouse over the text, right-click, and choose "Format shape…". The Format Shape panel will open on the right.
Make sure the "Shape options" tab is selected, then click the paint bucket button:

Choose "Solid fill", then colour white (or black, if your text is light-coloured). Then set the transparency to 50%.
Use readable fonts and good contrast
In general, use sans-serif fonts where possible (examples are Calibri, Arial, Verdana, or Helvetica). Serif fonts (such as Times New Roman) are not necessarily bad, but current guidance recommends sans-serif as being more accessible for readers with dyslexia.
Also avoid using multiple fonts, a changing typeface will make your text less readable. Usually, you will need no more than 2 fonts: one for headings, and one for the main text.
Make sure there is good colour contrast between the text and the background. See "Use text boxes over images" in this document for examples where an image is involved. For a solid background, ensure that there is good light/dark contrast between the text and the background.
Good contrast:

Poor contrast (if you cannot read these, don't worry, that's the point!):

Moodle HTML editor
The default font in the Moodle HTML editor is a readable sans-serif font, so if you stick with that you should not go wrong. Use paragraph styles throughout, then you will avoid having too many different fonts (see "Use headings and subheadings" for more on this).
Word & PowerPoint
In Word and PowerPoint, you have a wide range of font options. The key to legibility is to avoid the more elaborate fonts, such as 'script' fonts that mimic handwriting.
In Word, you can achieve consistency throughout your documents by using Styles (see "Use headings and subheadings").
In PowerPoint, consistency is achieved by using slide layouts. (See "Use headings and subheadings" for more on this.) Usually you will be working from a built-in, or downloaded, slide layout which is likely to use clear and consistent sans-serif fonts.
However, if you do need to change the font, try to do so by editing the Slide Master (click View, then Slide Master). This way, any changes you make to fonts will be repeated on that slide type throughout your presentation.
PowerPoint (Mac) View ribbon, showing Slide Master button
Write descriptive links
A descriptive link tells the user exactly what is being linked to (the "target page").
Poor practice:
You can find the UN Sustainable Development Goals report 2020 here.
Good practice:
Click here to read the UN Sustainable Development Goals report 2020.
In the first example, the link text, "here", contains no information about the target page. This information is found in text adjacent to the link, which can be especially problematic for users who rely on screen readers to access documents.
In the second example, it is entirely clear to all users what the target page is.
Ideally, use the title of the target page as the link text - assuming that it has a title that adequately describes its content, of course.
Ensure keyboard navigation can be used
Provided you follow the guidelines provided in the "Use headings and subheadings" sections and the "Write descriptive links" section in this document, then your documents will be navigable by keyboard.
Allow user control of video and audio
When adding a video to Moodle or to a web page, you will either provide the user with a link to open the video, or else you will embed the video into the page.
If providing a link, no further work is required. The video will open either in the user's own video player, or else in a particular site, such as YouTube. In either case, it is likely that the user will have all the control that they require.
When embedding videos, however, care must be taken to avoid taking control away from the user.
Note: There are several ways to embed video into web pages, depending on where the video is coming from, and we don't have room to go into the details here. Please check the guidance and support available elsewhere for the video embedding method you are using. The advice that follows should be applied to the method you use, if possible, but we recognise that it may be too technical for many readers.
When embedding video:
Do not enable the "autoplay" option, if possible. It is annoying for everyone to have videos start up unbidden, and even more so if you need to use accessibility tools to turn it off.
If embedding using an "iframe", add a title attribute to the iframe element. For example, if the embed code starts like this: <iframe width="560" height="315" src="https://www.youtube.com/… etc.Then add a title as follows: <iframe title="Price elasticity of demand (video)" width="560" height="315" src="https://www.youtube.com/… etc.The word "(video)" is included in the title because tools such as screen-readers might not recognise the iframe as containing a video, and thus be unable to warn the user that one is present.
Make my Moodle course accessible
Moodle itself is designed with accessibility in mind, and much of the work of making your course accessible is already done. You need only be concerned about the content you add to Moodle, whether that is via the HTML editor, or by uploading content. The advice elsewhere in this document will allow you to ensure the accessibility of the content you add.
Add transcripts and captions to video and audio
A transcript is a document providing a written version of the spoken content of a video or audio file, so that learners with hearing difficulties can access such content.
Captions (or subtitles) synchronise the text of the transcript with the video, so that the worlds appear on screen at the same time that they are spoken.
At minimum, a video should be accompanied by a transcript, although captions are a suitable alternative or supplement.
There are various ways of producing transcripts and captions:
Write a script: If you are recording video content, you can write a script in advance, and then use that script as the transcript. In practice there will likely be differences between the script and what you actually say, but as long as there are no major differences in the substantive content, the script is a suitable alternative.
Auto-captioning: Platforms such as YouTube and Microsoft Stream use voice recognition to automatically create captions for the videos that you upload. These captions can be downloaded, then converted into transcripts using online services such as Subtitle Tools. The advantage of automatic methods is that they have zero marginal cost, and are produced very quickly (a matter of minutes for a short video of < 10 minutes). However, they are prone to errors, particularly where technical terms are used, or for speakers not using their native language. Please see Automatic generation of transcripts and captions for recorded video for more details.
Human transcription: A number of companies offer transcription services, taking your video content and producing a set of captions and/or transcript to a target level of accuracy. As the transcripts are checked against the original by humans, the results are more accurate than fully automatic approaches. However, such services can be very expensive when there is a large amount of video content to transcribe. Human authored transcription is now automatically added to lecture recordings in Echo 360 where there is a student with an LSE Disability and Wellbeing Service registered inclusion plan. Please see this Echo 360 transcription guide to learn how to view and download transcriptions
When your transcript is ready, you can add it to Moodle as a separate Page resource underneath the video.
If you need to add a caption file to a video, the approach will depend on where your video is hosted:
Stuck?
If this page has not answered your questions, you can get further help by contacting Eden.Digital@lse.ac.uk