| Table of Contents | ||||
|---|---|---|---|---|
|
Why use it?
Folders are useful for grouping multiple filesstoring multiple files together. If you are sharing a lot of files, use folders to avoid long lists of files cluttering up a Moodle page and creating an ‘endless scroll’ problem for your students.
Note:Please ensure that you are not in breach of copyright law when adding folders of files to Moodlee.g. files such as scanned chapters from books or journal articles downloaded from the internet must not be uploaded to Moodle.
...
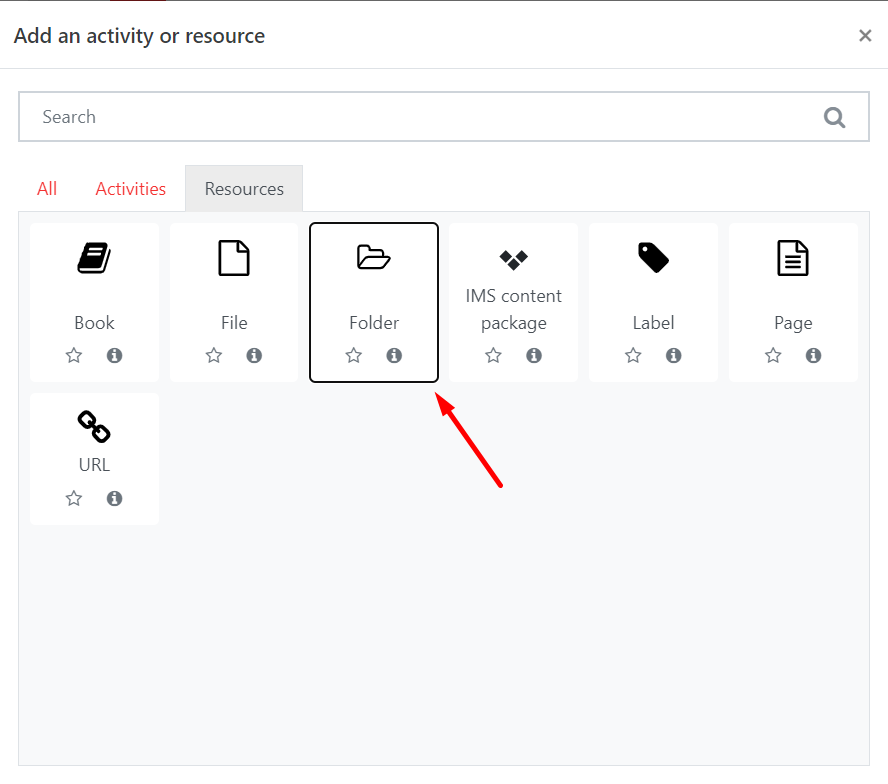
Go to the course page and Turn editing on. Scroll to the section where you want your Folder to be displayed, click Add an activity or resource and pick Folder from the Resource tab.
| Expand | ||
|---|---|---|
| ||
 |
Step 2: Settings
| Info |
|---|
Tip: Click on the question mark icon |
General
Provide a Name and, optionally, a Description for the folder.
Content
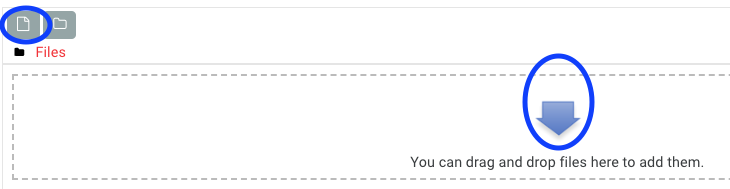
In the Content area, you are presented with two options to add files.
...
Once selected, Save as to save the file under a different name.
Author can be changed if the default (your name) is not appropriate.
Select an appropriate license.
Use a clear, descriptive name for your folder. Use the description field if you wish to provide longer contextual information for students. To display the description next to the folder on your Moodle page, tick 'Display description on course page'.
Content
Method 1 - File picker
Click the Add icon
 to open the file picker. Click Upload a file, then Choose a fileto find the right file on your computer. You will have the option here to change the name by which the file will be saved to Moodle.
Select an appropriate license.
ClickUpload this fileto complete the upload.
Repeat the process for each file to be included in the folder or add a single zip file containing the files.
Note: Please ensure that you are not in breach of copyright lawwhen adding files to Moodlee.g. files such as scanned chapters from books or journal articles downloaded from the internet must not be uploaded to Moodle.
...
2. The second option is to drag & drop the file directly.
...
| title | Click here to see the screenshots... |
|---|
...
Method 2 - Drag and drop
Drag a file from a folder and drop it directly into the upload box on the settings screen for your file resource
Repeat the process for each file to be included in the folder, or add a single zip file containing the files.
...
| Expand | ||
|---|---|---|
| ||
 |
Appearance
In the section marked Display folder contents, choose how you wish folders to appear to students. Click on the question mark icon ![]() next to each icon for more information.
next to each icon for more information.
| Expand | ||
|---|---|---|
| ||
 |
On completion, click Save and return to course.
Replacing
...
, removing, or adding files
The contents of a folder can be changed at any time by editing the folder itself.
First, Turn editing on.
Next to the Folder, click on the cog icon ![]() and from the dropdown select Edit settings.
and from the dropdown select Edit settings.
Click Add new files using the method above. To remove an unwanted file, click on the existing file. A window will appear in which you can click on Delete.You can now upload a new file.
Organising files within folders
By default, files in folders will appear in alphabetical order. When viewing the files on Moodle, students can reverse alphabetical order or arrange files by creation date. To ensure your folders are easy to navigate for your students:
Use subfolders where relevant
Name all files and folders clearly
Use a clear file naming system
Make sure files with numerical names also make sense alphabetically. Use a reversed YYMMDD system for dates and preface single digit numbers with a 0. eg:
22-03-21 Problem Set.pdf
22-04-04 Problem Set.pdfWk09 Answers.docx
Wk10 Answers.docx
| Filter by label (Content by label) | ||
|---|---|---|
|